Anna is a co-founder of Adventure in You and has been traveling the world for the last 9 years. She has spent time living in Thailand, Mexico, Indonesia, and Spain and is our local expert in these areas. Her expertise on travel, gear, and building businesses have been featured on Foundr, Business Insider, Yahoo Travel, and more.
Although Google still remains to be our biggest source of traffic, Pinterest is definitely a GREAT way to drive more people to your website/blog. In this article, I will break down the basics of how to set up a Pinterest account and how to use it to explode your website traffic this 2018.
To give you a rough idea, out of our 500,000 page views every month, 60,000 of that comes from Pinterest alone. Considering I spend only a few hours every month scheduling posts, I would say taking the time to nail your Pinterest strategy is worth it.
To start with, I will give a very brief introduction on what Pinterest is, how to use it and set it up then we can move on to creating a few key strategies to help you drive your pageviews up.
If you’re unfamiliar with the platform, Pinterest is a visual site which allows you to easily find information from the internet through pictures (pins). When you create a profile, you essentially play the role of a curator, finding good content and organizing it into boards.
You can then type whatever it is you’re looking for on Pinterest and it will act as a search engine showing you all the related results.
One common mistake that I see people make is treating Pinterest as a social media platform. I repeat, Pinterest is NOT a social media platform. If you set your account up to act like a search engine (i.e. you optimize your profile and pins with keywords), then you are making it easier for Pinterest’ algorithm to find your pin and present it to others as a relevant search result.
The more people see your pins, the more chances that your article will be clicked and read.
Setting Up Your Pinterest Account
Even if you already have a personal Pinterest account, I urge you to start a brand new one for your blog/website. When setting it up, remember to get a business account which will allow you insight and access to their analytics. It is free to sign up either way.
Next, you have to make sure that your profile is fully optimized. Make sure it has the keywords that you’re trying to rank for!
For example, if you have a food blog, make sure your profile has the words food blogger, recipes, kitchen, etc. This will help increase your chances of being suggested by Pinterest when someone searches for the term food blog. You can check out Adventure in You’s Pinterest account here!
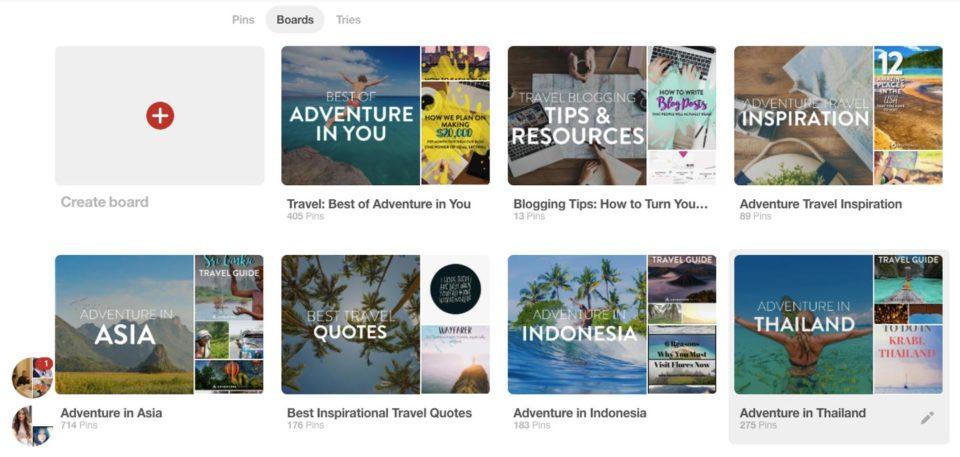
Pinterest Boards
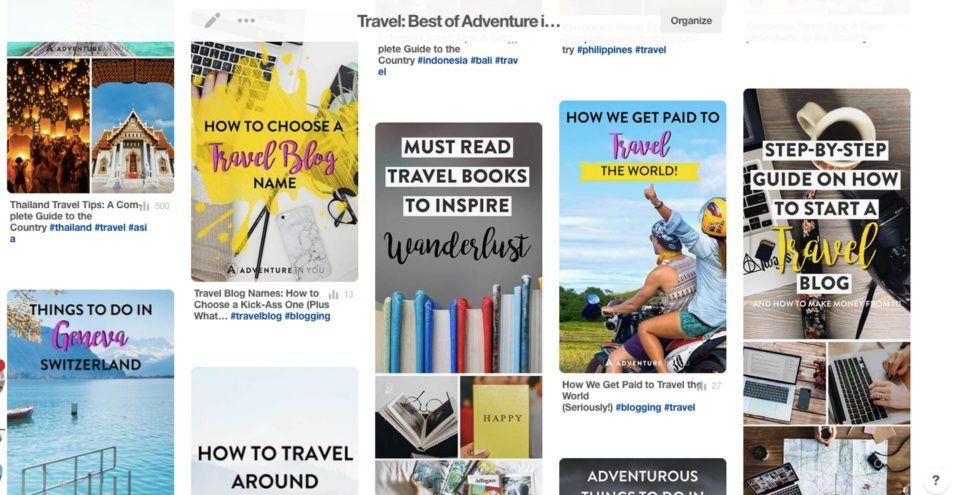
Pinterest Boards are a way to help you categorize your pins. Think of them as online folders based on one topic. In our case, we have a Best of Adventure in You board (this is where I pin all my pins first before spreading them out), a Thailand Travel board, a European Travel Board, a board for Travel Tips, etc.
Whenever I browse through articles which I think deserves a spot on any of my boards, I know exactly where to pin it! I also took the time to create board covers so they look clean and organized!
Pinterest Board Tip: Arrange your boards from the best to last and make sure you have cohesive themes and good looking pins.
Pinterest Group Boards
Group boards, on the other hand, are made up of multiple members that all contribute to the board. When you’re first starting, you want to join as many group boards as possible around topics that you have content on. Later on, you can do a big group board audit to see which ones are working for you and which ones aren’t.
When you get a pin, I usually pin it first to my Best of Board then I schedule across multiple group boards.
Once, I had a pin go viral because someone with a big Pinterest following repinned my pin from one of the group boards I posted in.
If you dig deeper into the Pinterest analytics, it will tell you which boards have the best repin rates, engagement, etc. You can use Pingroupie in order to find boards that are relevant to your niche. Sometimes, requesting to join group boards can be a pain but don’t lose hope. You can also join Facebook Groups like Pinterest group boards where you can request to join certain group boards.
Every group board has their own house rules so make sure you read the description to avoid getting booted out!
Free Training: If you want to know how we exploded our traffic and got to 500,000 page views a month in just over 24 months, then you need to attend our Free Masterclass Training! Here, we share some of the biggest shifts which changed our business. It’s 100% free and is full of actional value bombs.
How to Create Kick-Ass Pins
Now that we have the Pinterest basics covered, let’s move on to the fun stuff. Creating pins! While some people hate the process, I absolutely love it.
After I write and format an article, the first order of business for me is to create a pin that I can put at the bottom of each article. Given that Pinterest is a visual tool, you NEED to make sure your pins stand out.
You know the saying don’t judge a book by it’s cover? Well, sad to say, no matter how great your content is, if your pin isn’t visually appealing, chances are, people won’t click it!
Pins that are bright, have easy to read text, and are captivating tend to do really well on this platform. The recommended Pinterest size now is 735 x 1102 but I tend to create pins that are even longer, sometimes going for 735 x 1500.
Update: Pinterest has recently changed its algorithm stating that pins need to be 2:3 ratio and nothing longer than 1260 height!
In order to create these pins, I simply log on to Canva (aka the most useful tool in the world for bloggers) and design away. If you’re not the most creative person, Canva has pre-made templates that you can simply edit.
To help you create better-looking pins, log on to the site and make a note of a few of your favorite looking pins. From this, come up with 10-15 different designs that you can rotate with so that you don’t need to think every time you make a pin!
Sometimes, if I have an article that is doing really well, I create 2 pins and A/B test which one performs better! You can do this as well by creating multiple pins for one article and waiting to see which one would go viral.
A Useful Guides to Follow for Creating Pins:
Use easy to read fonts! Although having pretty scripts are great, if no one can read them then they’re useless. Whatever you do, use easy to read fonts!
Organize your text from left to right (making it easier to read) and keep all the text in one place if possible!
Use bright captivating images
Experiment with various Pinterest pin sizes.
Remember: Your SEO title and Pinterest Pin title can be completely different. Try out different variations to see which ones people relate to more! (ie. my SEO title could be “Thailand Travel Tips” but my pin could say “The Best Tips for Traveling Thailand”
Resources for Pin Creation
One thing I need to stress is that unless you’re the worlds most amazing photographer…don’t be scared to use stock photos…especially when creating pins! You need your images to WOW people when they scroll down. Listed below are a few of my favorite royalty-free stock image sites which I use for when I create pins.
Pixabay
Pexels
Unsplash
StockSnap.io
Freestocks.org
Quick Recap:
1. Set up your Pinterest (or make a switch) to a business account
2. Join as many group boards as you can then evaluate which ones are working
3. Create awesome looking pins using stock images!
Optimizing Your Pinterest Like a Boss
Okay so now that we’ve covered the basics, we can now move on to making sure your pins and Pinterest Profile is seen. As mentioned, Pinterest isn’t a social media outlet which means you don’t need to have tons and tons of followers in order to see results which is one of the many reasons why I love this platform. As long as you optimize your account and pins with the right keywords, you’re bound to get some traffic from it.
What’s a Good Pin Description Anyways?
When uploading a pin to your WordPress (not sure if this is applicable to other sites), you need to make sure that you fill in the ALT tag with your Pin description. That way, when anyone pins your pin (hah!), the description that you wrote goes with it.
Now before we move towards pin descriptions, you need to know what exactly makes a good one! For me, good Pin descriptions have the following:
call to action
catchy and interesting
hashtags (based on recent Pinterest changes)
keywords
Before I move on to HOW exactly to write these descriptions, let me explain what each point is so you can see exactly what I mean.
Call to Action- Using the words, “check out my, click the article to find out, read this article, take a look, etc.” can be very powerful because you’re telling them exactly what to do. I always try to add an action word at the end of my pin description because I believe it helps improve click-through rates.
Catchy and Interesting- Now there are two ways of writing descriptions (I will discuss both later) but basically, you need to be as creative and enticing as possible in your description. You need to provide them with a clear idea of what value your article can provide once they click over. On that note, never ever make up a description with the false pretense of just getting people to click-through!
Hashtags- Recently, Pinterest rolled out the use of hashtags (even though they said before they wouldn’t!) While I don’t really know how it affects your rankings, I would begin putting them anyways! When you click the #, you can find other pins which use the same tag, making it easier to find content.
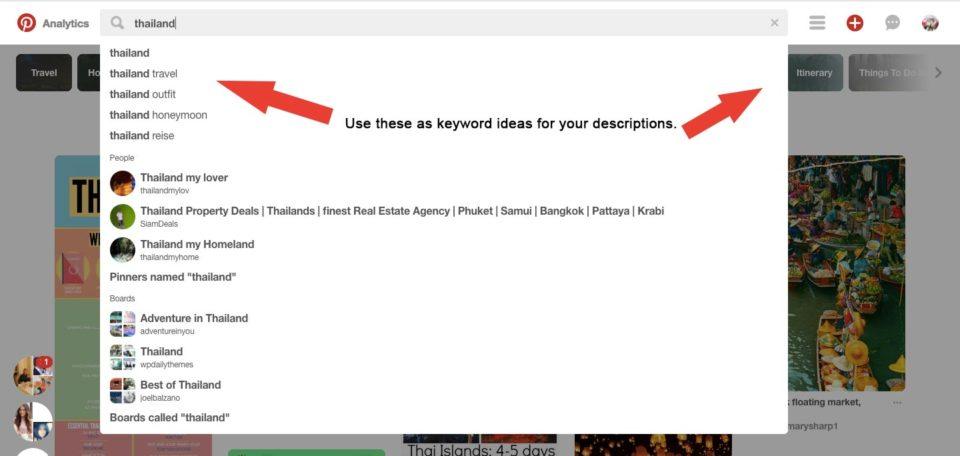
Keywords– Similar to writing keyword optimized posts for Google, you need to fill your Pinterest description with keywords that you want to rank for. I think this is THE most important part of Pinterest and is what will set you apart from other accounts. To find out what people are searching for, you can use Pinterest’s predictive text in the search function as this is based on what people often search for. Alternatively, you can also see the tabs listed above which are common topics that people write/post about when it comes to your topics.
How to Write Good Pin Descriptions
There are two ways of writing Pin Descriptions. One is using keyword stuffing and the other is by writing a natural looking description with the necessary keywords. I often use the hybrid method, making sure I have all the elements I listed above.
Keyword Stuffing: Write words and put a | in between them ex: travel tips | travel advice | what to do when traveling| solo female traveler
Natural Descriptions: Write a description that includes these phrases without keyword stuffing ex: Scared of traveling solo? Check out my article full of awesome travel advice for solo female travelers. After spending 3 years on the road, I have compiled my best travel tips and advice to help others get over their fear of traveling.
Hybrid of Both: Solo Female Travel Advice | Scared of traveling solo? Check out my article full of awesome travel advice for solo female travelers. After spending 3 years on the road, I have compiled my best travel tips and advice to help others get over their fear of traveling. Click here to read the article.
Optimize Your Boards
Using similar concepts from what we discussed above, make sure your board descriptions are also optimized, containing the right keywords. This will help people find your board directly! Remember, if it is a search engine, you want to come up in all the results!
Quick Recap:
1. Use Pinterest to search for keywords relevant to the article you’re about to publish
2. Write awesome Pin descriptions that no one can resist!
3. Make sure your description has the 4 elements named above
Tips on How to Grow Your Account
Get the Plug-In
In order to get the most success from Pinterest, make sure that you have the Pinterest button installed on your blog/website. This will allow anyone to repin your pins with ease!
Pinterest Schedulers
Now comes my favorite part! Pinterest automation. As much as I love the platform, I try not to spend hours and hours of my time in there. It’s like a giant wormhole with lots of pictures of food which is basically my downfall. While on paper, I pin about 30-40x a day, in reality, I spend two hours at the start of every month scheduling things in advance.
It is an unwritten rule but you’re encouraged to pin 80% other people’s pins and 20% yours to avoid spamming groups. I personally do 60% mine and 40% others.
Really guys, stuff like this gets me soooo excited because I LOVE it when tools and programs do the work for me! I personally use Tailwindwhile I know some people use board booster. I tried both before but ended up just sticking with Tailwind.
Basically, with one click of a button, I can schedule the pins that I selected on my personal boards as well as group boards. As mentioned above, it picks up the ALT tags that you fill up in the description box which makes mass scheduling easy. While some people swear by manual pinning, I have tried multiple methods and this one works best for me.
Pinterest Group Threads
Again, this is another one that some people find useless but I, on the other hand, find super helpful to grow your profile and get repins. Repin threads are when you join FB groups, preferably in your niche then participate in their daily/weekly threads.
You participate by dropping a link to a pin that you want to boost in a thread. By the end of the given time frame, you need to repin everyone’s pins on to your various boards. So for example, one pin thread has 50 participants, by the end of that thread, you should have 49 repins from other people!
Although the Pinterest community is half in half with the importance of repin threads, I really believe in their value. In the latter end of 2017, Pinterest removed the repin count of pins and while everybody was reeling from this decision, I believe that in the end, repins still play a big role in the algorithm alongside with click-throughs and more.
While this may seem time-consuming at first, it does drive results! If you have a budget, you can even hire a VA to help you with this task. If your blog is travel related, here are a couple of travel-related repin thread groups that I recommend you join:
Last but not least, the success of your Pinterest is dependent on how active you are on the platform! As soon as you write a new article, pin it to your best of board. Join a repin thread. Schedule it across different boards and pin other people’s content as well. The more Pinterest sees you using their platform the better their algorithm will work for you. Stay consistent with the stuff you pin (remember, you’re a curator!)
Quick Recap:
1. Make sure your blog has the Pinterest widget so you can easily pin things
2. Use automation tools like Tailwind
3. USE and understand the platform
My Pinterest Process
After spending the holidays back home with my family, I was giving my sister some Pinterest tutorials and one of the things that she asked for stood out for me. She asked me to write down my EXACT Pinterest process and how I use the platform. While this will vary per person, this is what works for me!
1. Create a striking pin (I usually create 2- 1 long one and one short one)
2. Add the short one to the end of every blog post (similar to the one you will see in the end of this article)
3. Upload my long pin straight to Pinterest to my Best-of-Adventure-in-You board with all the proper descriptions
4. I usually enter that Pin in a repin thread
5. After it has a few repin counts, I then use tailwind to schedule it on various group boards/tailwind tribes
6. Sit back like a boss and wait for the traffic to roll in (kidding, I don’t really do this!)
7. After I have a few pins from my Best-of-board, I then sit down and schedule things around for the month using Tailwind again.
Hopefully, this Pinterest guide has given you heaps of ideas on how to use this platform to drive your blog heaps of traffic this year. What about you? Do you have any Pinterest tips that you can share? Now if you don’t mind, see that lovely little Pinterest Pin that I made below? If you found this article helpful, go ahead and pin it! You would make my day.
Looking for more articles on blogging? Check out a few of our best ones!
3 thoughts on “How to Explode Your Website Traffic Using Pinterest”
Thanks for the tips! It’s interesting to read about someone else’s pinning process. A while back I joined some repin threads too, but it’s a little frustrating you have to pin everything, also pins you don’t like and otherwise wouldn’t pin. That’s why I quit. But maybe I should just get over it? I take it you don’t schedule the pins from a repin thread, just manually pin them at that moment?
And is organising your Pinterest boards such a pain as it is with me? When I move boards they switch places instead of just inserting the board I’m dragging in between the 2 other boards. I gave up organising them.
Thanks for reading @birthevandermeeren:disqus !! Yes, it is frustrating at times. As much as possible I try to find a board that could work for all the pins but if all else fails, I have like a general bloggers pins board. If it is something I am against (i.e. some people don’t want to pin anything with alcohol or I personally would never pin anything encouraging animal tourism), I politely send them a message saying I pinned something else.
When rearranging boards, I go to the Chrome menu (or whatever your browser is) and try to find a view button. If you take it down to 40%, you can easily move boards around. 🙂


![[EXPLODE YOUR BLOG TRAFFIC] In this article, I will share how I get 40,000 pageviews every month from Pinterest alone! I will walk you through how to set Pinterest up, how to find the right keywords, and how to write kick ass pin descriptions that will help you grow your blog's traffic! #blogging #pinterest #traffic](data:image/svg+xml,%3Csvg%20xmlns='http://www.w3.org/2000/svg'%20viewBox='0%200%20735%201202'%3E%3C/svg%3E)
![[EXPLODE YOUR BLOG TRAFFIC] In this article, I will share how I get 40,000 pageviews every month from Pinterest alone! I will walk you through how to set Pinterest up, how to find the right keywords, and how to write kick ass pin descriptions that will help you grow your blog's traffic! #blogging #pinterest #traffic](https://k7g2e5d2.rocketcdn.me/wp-content/uploads/2018/01/Explore-pinterest.jpg)
Thanks for the tips! It’s interesting to read about someone else’s pinning process. A while back I joined some repin threads too, but it’s a little frustrating you have to pin everything, also pins you don’t like and otherwise wouldn’t pin. That’s why I quit. But maybe I should just get over it? I take it you don’t schedule the pins from a repin thread, just manually pin them at that moment?
And is organising your Pinterest boards such a pain as it is with me? When I move boards they switch places instead of just inserting the board I’m dragging in between the 2 other boards. I gave up organising them.
Thanks for reading @birthevandermeeren:disqus !! Yes, it is frustrating at times. As much as possible I try to find a board that could work for all the pins but if all else fails, I have like a general bloggers pins board. If it is something I am against (i.e. some people don’t want to pin anything with alcohol or I personally would never pin anything encouraging animal tourism), I politely send them a message saying I pinned something else.
When rearranging boards, I go to the Chrome menu (or whatever your browser is) and try to find a view button. If you take it down to 40%, you can easily move boards around. 🙂
That’s genius, zooming out to rearrange your boards! Why didn’t I think of that? I immediately started organizing. ?